
Singer 29-4 Patch Machine
The day finally came for an honest effort to get my 1909 Vintage 29-4 Singer Patch machine, or shoe/ boot repair sewing machine to work, this thing has set here for some 4-5 years now and wouldn’t sew 5 stitches without missing one. I purchased this form a Cobbler (shoe repair, Harley Paraphernalia semester, and heavy on the ster) anyway I had stopped there for some leather shoe laces and it was sitting next to the front door, for grins and giggles I asked if it was for sale seeing that I was looking for just that model sewing machine. The fellow said yes I have been thinking of selling it, I asked how much and he said I would have to think about that for a while so I came back 3 days later and took it home for much less than expected, new copies run $1800 and up and used machines run $600 and up. I had aspirations of doing things that I never had capabilities of doing, projects and ideas that run around in my head that need to be done to clear my mind. To expand a little, I get bored with things very easily, this would explain the numerous hobbies I have, there is great satisfaction in working at something with no prior knowledge and accomplishing it, I am asked all the time what, how, when, where did you do that, so is the reason for this site, if you want an explanation I put it on here.
Well I finally found out why it went so cheep, everything is wore out but it is a machine and machines can be fixed, the only problem is I have no prior knowledge of how to fix it without something to compare it to. So began the 3 day vigil of dismantle and put it back together, trial and error to find out what makes it tick and then, low and behold one thing made a difference. As they say the light came on, after finding one thing that made a difference the rest was down hill and by the end of day 3 I had a machine that worked. It does help the have equipment to make parts, parts for this machine are available but at a price, I’m not sure if the new machines available today that were copied from this original Singer have parts that would interchange so I will make my own.
At this time most of my fixes are not permanent, I intend to redo most of them when I have are right materials for machining and take the time to do the proper machine set-ups to repair the years of wear. One would ask why just do temporary fixes and not permanent, to answerer that is if I knew what was the right fix at the time it would have been permanent but I do not want to do something that cannot be undone if it doesn’t work.

A sad feature of this machine is that it had been painted, covering that wonderful old industrial art, the original gold decals, what a shame. In removing the old paint it takes the original decals with it so I quit at this point, I plan to do something to replace the decals and bring it back to its industrial artistic look, and if pictures of the original decals can be found they can be reproduced on my computer. If anyone knows where I can find this artwork please contact me thru this site, my searches have turned up nothing so far. Thanks

The thread spool and guide are temporary also, these were fixes to test function and make sure things feed properly. The auxiliary table is made of Baltic Birch plywood, I’m not sure if it is what was available originally but is as close as I could get looking at a picture of one, that so far has worked admirably. At the point that this machine gets restored to its original look I will post the follow up pictures for now this is as good as it gets.

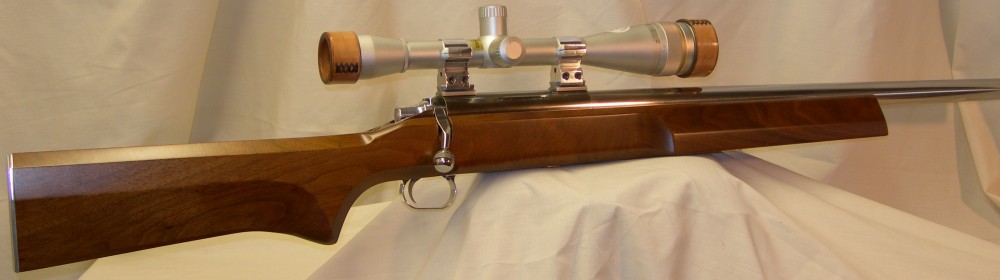
Leather Stock Boot
The first sewing after my temporary fixes, the leather stock protector used to keep solvents off the stock when cleaning a rifle, a friend had asked to have one made slightly different and longer than previous ones I’ve made. This is just one of many projects I have in mind, more to follow as time permits……..Thanks for looking
May 2012
It is approximately 2 years since posting the first article on my Singer 29-4; some changes have been made since then. To begin I had many problems, skipping stitches, worn machine parts and trying to repair things without a manual on just what to do, it was a lot of trial and error but it eventually all worked out and all the temporary fixes were made permanent.
The needle bar driving lever where the piston connects was worn out so I machined it oversize and bushed that. The foot bar revolving joint complete was bent, this item is no longer made so I straightened it and tightened up the bushing joint, stoned all surfaces, it seems to work as it should. (I may not have all the proper terms for the machine parts but it is as close as I am able to tell) The needle cam bar follower is worn badly; I could not find a replacement at the time so I turned it 90 degrees to an unworn portion of the cam which corrected the stroke. The shuttle, rack and shuttle carrier pinion have a considerable amount of slop, these parts I did not look for but rather carefully shimmed the rack for a closer fit, not correct but the timing seems to be ok for now. After all this it has only skipped a stitch twice, not sure why but I can live with that. All in all it works very well considering its age and the general amount of wear it has so as time goes on and I find replacement parts it will only get better. The thread holder and arm was replaced with a different unit to hold the larger spool of thread.
I originally set it up with the thread size it was designed for which is #69 or so I am told by my sources for parts and info at that time. I suppose that the #69 thread is good for garment, chaps and the like but doing harness work or gun leather and belts I really wanted something larger. I found another company called horsenharness.com, among there parts list is stated that size #138 is the largest thread that can be used on this machine. I called and spoke with the sales lady and she stated that this is all the owner uses; they sell the thread, needles and everything that works for this machine using this thread. I ordered the thread, needles, a troubleshooting DVD and 6 extra bobbins, after setting it up with this large thread I found that the needle was just too big for my application. Among my assortment of needles I dropped the needle size form 23 to a 20 and everything fell into place. So the combination to make this machine to sew with size 138 thread is as follows,
#138 bonded nylon 66 pre-lubricated thread on top, #69 bonded nylon 66 pre-lubricated thread for the bobbins (this has to be used as stated or it will not work), a Schmetz SY3355/ DPx17/135×17 size 20 needle and it will sew like a dream.. Before I switched thread size I had made several projects using the #69 thread, I had no problem sewing ½ inch material; the only thing that bothered me was the thread size looked to small for the project. Last but not least I ordered the DVD is very useful and highly recommend its purchase especially if you do not have a manual or parts breakdown, it is all on this DVD.

The auxiliary table that I made just sits on the machine without anything to hold it tight so I got tired of it moving and made two brackets and use a Velcro strap to secure it in place. My intent is to make some sort of an adjustable guide that is fixed on the table for sewing straight lines on long pieces such as the $3000 machines have but that will come later. Since posting pictures of my machine I have had many inquires on my auxiliary table as to how it is made so I took a picture of the bottom to show just how it attaches to the machine, the Velcro strap makes it rock solid.

Aux Table
After 5 years of looking at the ugly blue that someone painted this machine I finally had to remove the rest of it, just a little touch-up with some black lacquer makes it a little more pleasing. At some point in the future it will get some gold accents on the name plates.

The blue paint is gone!
September 2012
This is probably my last update to this page; I did a search on eBay for some decals to dress up this machine and to my surprise I found some. At $20 the sheet came with enough decals so if I messed up I could try again and for the price there is no way I could replicate them myself. For the machine base I used some acrylic gold paint then finished with some clear lacquer, the decals had to be top-coated with clear lacquer also so they wouldn’t rub off. There is one thing I haven’t addressed and that is the drive belt, I had one on it and removed it, seems that I am not coordinated enough to keep it running in the same direction. At some point it would be nice to have both hands free to control the work so I will have to work on my coordination……..

January 2014,
With the popularity of this page I cannot ignore doing an up-date of some things that have been done since 2012. This will be brief for I really haven’t done much with the machine this past year except finish some of the planned additions.
First: as can be seen in the following pictures I have completed my drawer that was missing when I purchased it; the slides were there but no drawer. I need some place to house accessories as not to be out of reach when needed.
Second: was the tool holder on the side, the main reason was for holding the threading rod for it was too long to fit into the drawer plus it will hold a screwdriver and whatever else that would not fit in a drawer.
And third: was the treadle belt, something that I had difficulty operating and still do but as one can see it is on and ready for action. I was contacted by a reader (Matthew in the comment section December 2013) that had a tip on up-grading the belt to a spring drive belt. My order to McMaster-Carr was in the process so I added these two more items for my up-grade…….see Matthew’s comment for info and Part #’s. At this time I haven’t spent much time with the treadle but what time I have it works very well, as any new info or tips come in I will post or direct you to them.

Spring Belt and connectors

Installing Spring Belt

New Drawer, Tool Holder and Spring Belt

Latest Pic of My Machine
Thanks for looking……..
Have fun………
Rick
Link for Decals………….http://www.keelersales.com/servlet/Detail?no=793
October 2014
This past summer I have been working with the treadle, when I first started it seemed to work quite well but as a newbie at chewing gum and walking I found that there are problems that I overlooked. Now I have to reiterate that I am far from an authority on these machines, just a hobbyist at best but it seems that this spring belt slips more than I had expected thus giving me fits. Now that the fall is here my time spent in the woods and on the water takes first place so the belt thing will have to be continued at a late date. To make my point clear I am not sure that this spring belt will work for my own personal use, most of what I sew is heavy material and this is where I find that the spring belt slips.
I felt that I should note this to all that read my blog, there will be an update to this comment/ post as soon as I find a cure for my problem but until then don’t let this sway you from trying the spring belt for it just may work for your application/ use.
Rick

Basic Table Plans…
(Measurement are taken from my machine/ table, your machine may be slightly different….)
I thought this was interesting and worth posting, table pictures of 29 Singer table, other useful info too.
http://needlebar.org/nbwiki/index.php/29 (Click on NBWiki – Needle Bar) scroll to bottom of page.
RA
