
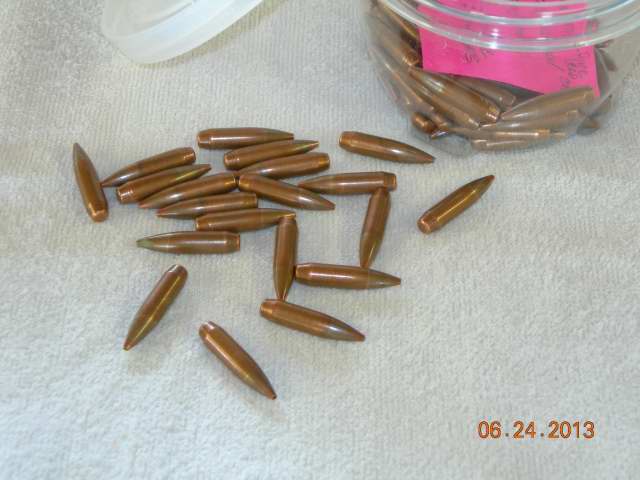
100 Gr, 6mm Vari-base Bonded Bullets
Bonded Bullets
I am not sure just where to begin so I’ll start with a little history to explain how I arrived to the topic of bonding bullets.
Back in the good old days of deer hunting in Michigan’s Upper Peninsula from my first year in 1968 until my last year in 2000 I hunted with a variety of calibers. From the little 30-30 Winchester to .280 Remington and mixed in with those were .308’s and .243’s to which the .243 was my favorite gun to carry. Back in those days my beliefs in just what a bullets performance should be was different than today, I never lost an animal but the performance of the bullets I used in that little .243 was poor at best. After 2000 I had essentially quit rifle hunting, hunting in mid-Michigan with a rifle on public land is almost suicide in my mind so I started bow hunting in 2002. I acquired some privet property to bow hunt on in 2008 and then in 2011 was allowed to rifle hunt there also so last rifle season (2012) I shot a buck with my favorite little .243 Win… Being that this little Rem. 700 is a factory gun, light and quick handling is the main reason I carry it but admit that it doesn’t digest just any bullets so what shot the best was not the right choice for killing performance. So when I dress him out all I found was the separated copper jacket of the 100 grain bullet, so now we arrive to the topic………..
Seeing that I make my own 6mm and 30 Cal. Bullets I decided to investigate building my own Bonded Hunting bullets. This little project has given me a chance to explore the use of some other equipment that I haven’t had the chance to use yet plus it expands ones knowledge of things.
First off I needed to accumulate all the necessary components………
Jackets of the right type……..?
Bonding agent……..?
Ceramic heat-treat blocks?
Which lead?………pure lead or can it have antimony/ tin added?
What methods are used?
What equipment is needed?
What tooling is needed?
Do I need to make/ build tooling/ fixtures?
Etc……….
Corbin has everything needed to manufacture a bonded bullet, I went thru my list and ordered the minimal amount of stuff to cover this project, the rest as you will see I made as it was needed for I found that some items didn’t perform as I liked.
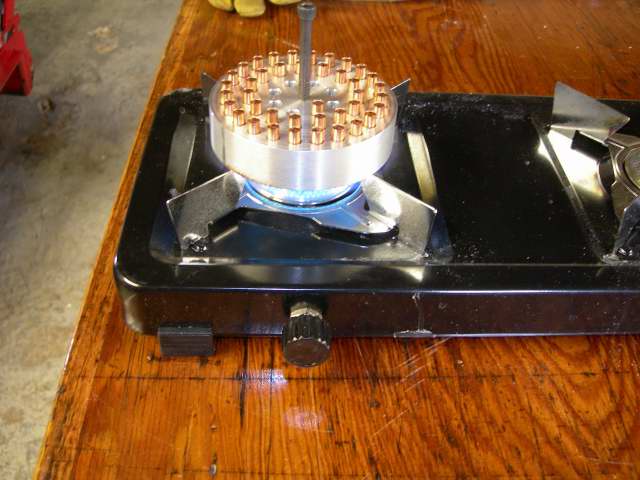
For the first test bullets I started with 12 and ended up with 9 that I could actually send down a barrel, the target shows 6 shots and that is all I had to test for accuracy with. The first 3 were testing charges and shot into the dirt pile in my back yard. (The target that measures .741 for the last 4 shots, the .664 group was some BT’s on a shorter jacket that were not bonded.) Also these bullets are the real first boat tails that I made, I have had this die for probably 3 years and haven’t played with it until now, one of those explore issues. At this time I deemed this project a go for these bullets are no worse than anything else I have put thru this gun which will group in the ¾ to1 ¼ categories depending, so now all the makeshift and cobbled up stuff used will need to be made.
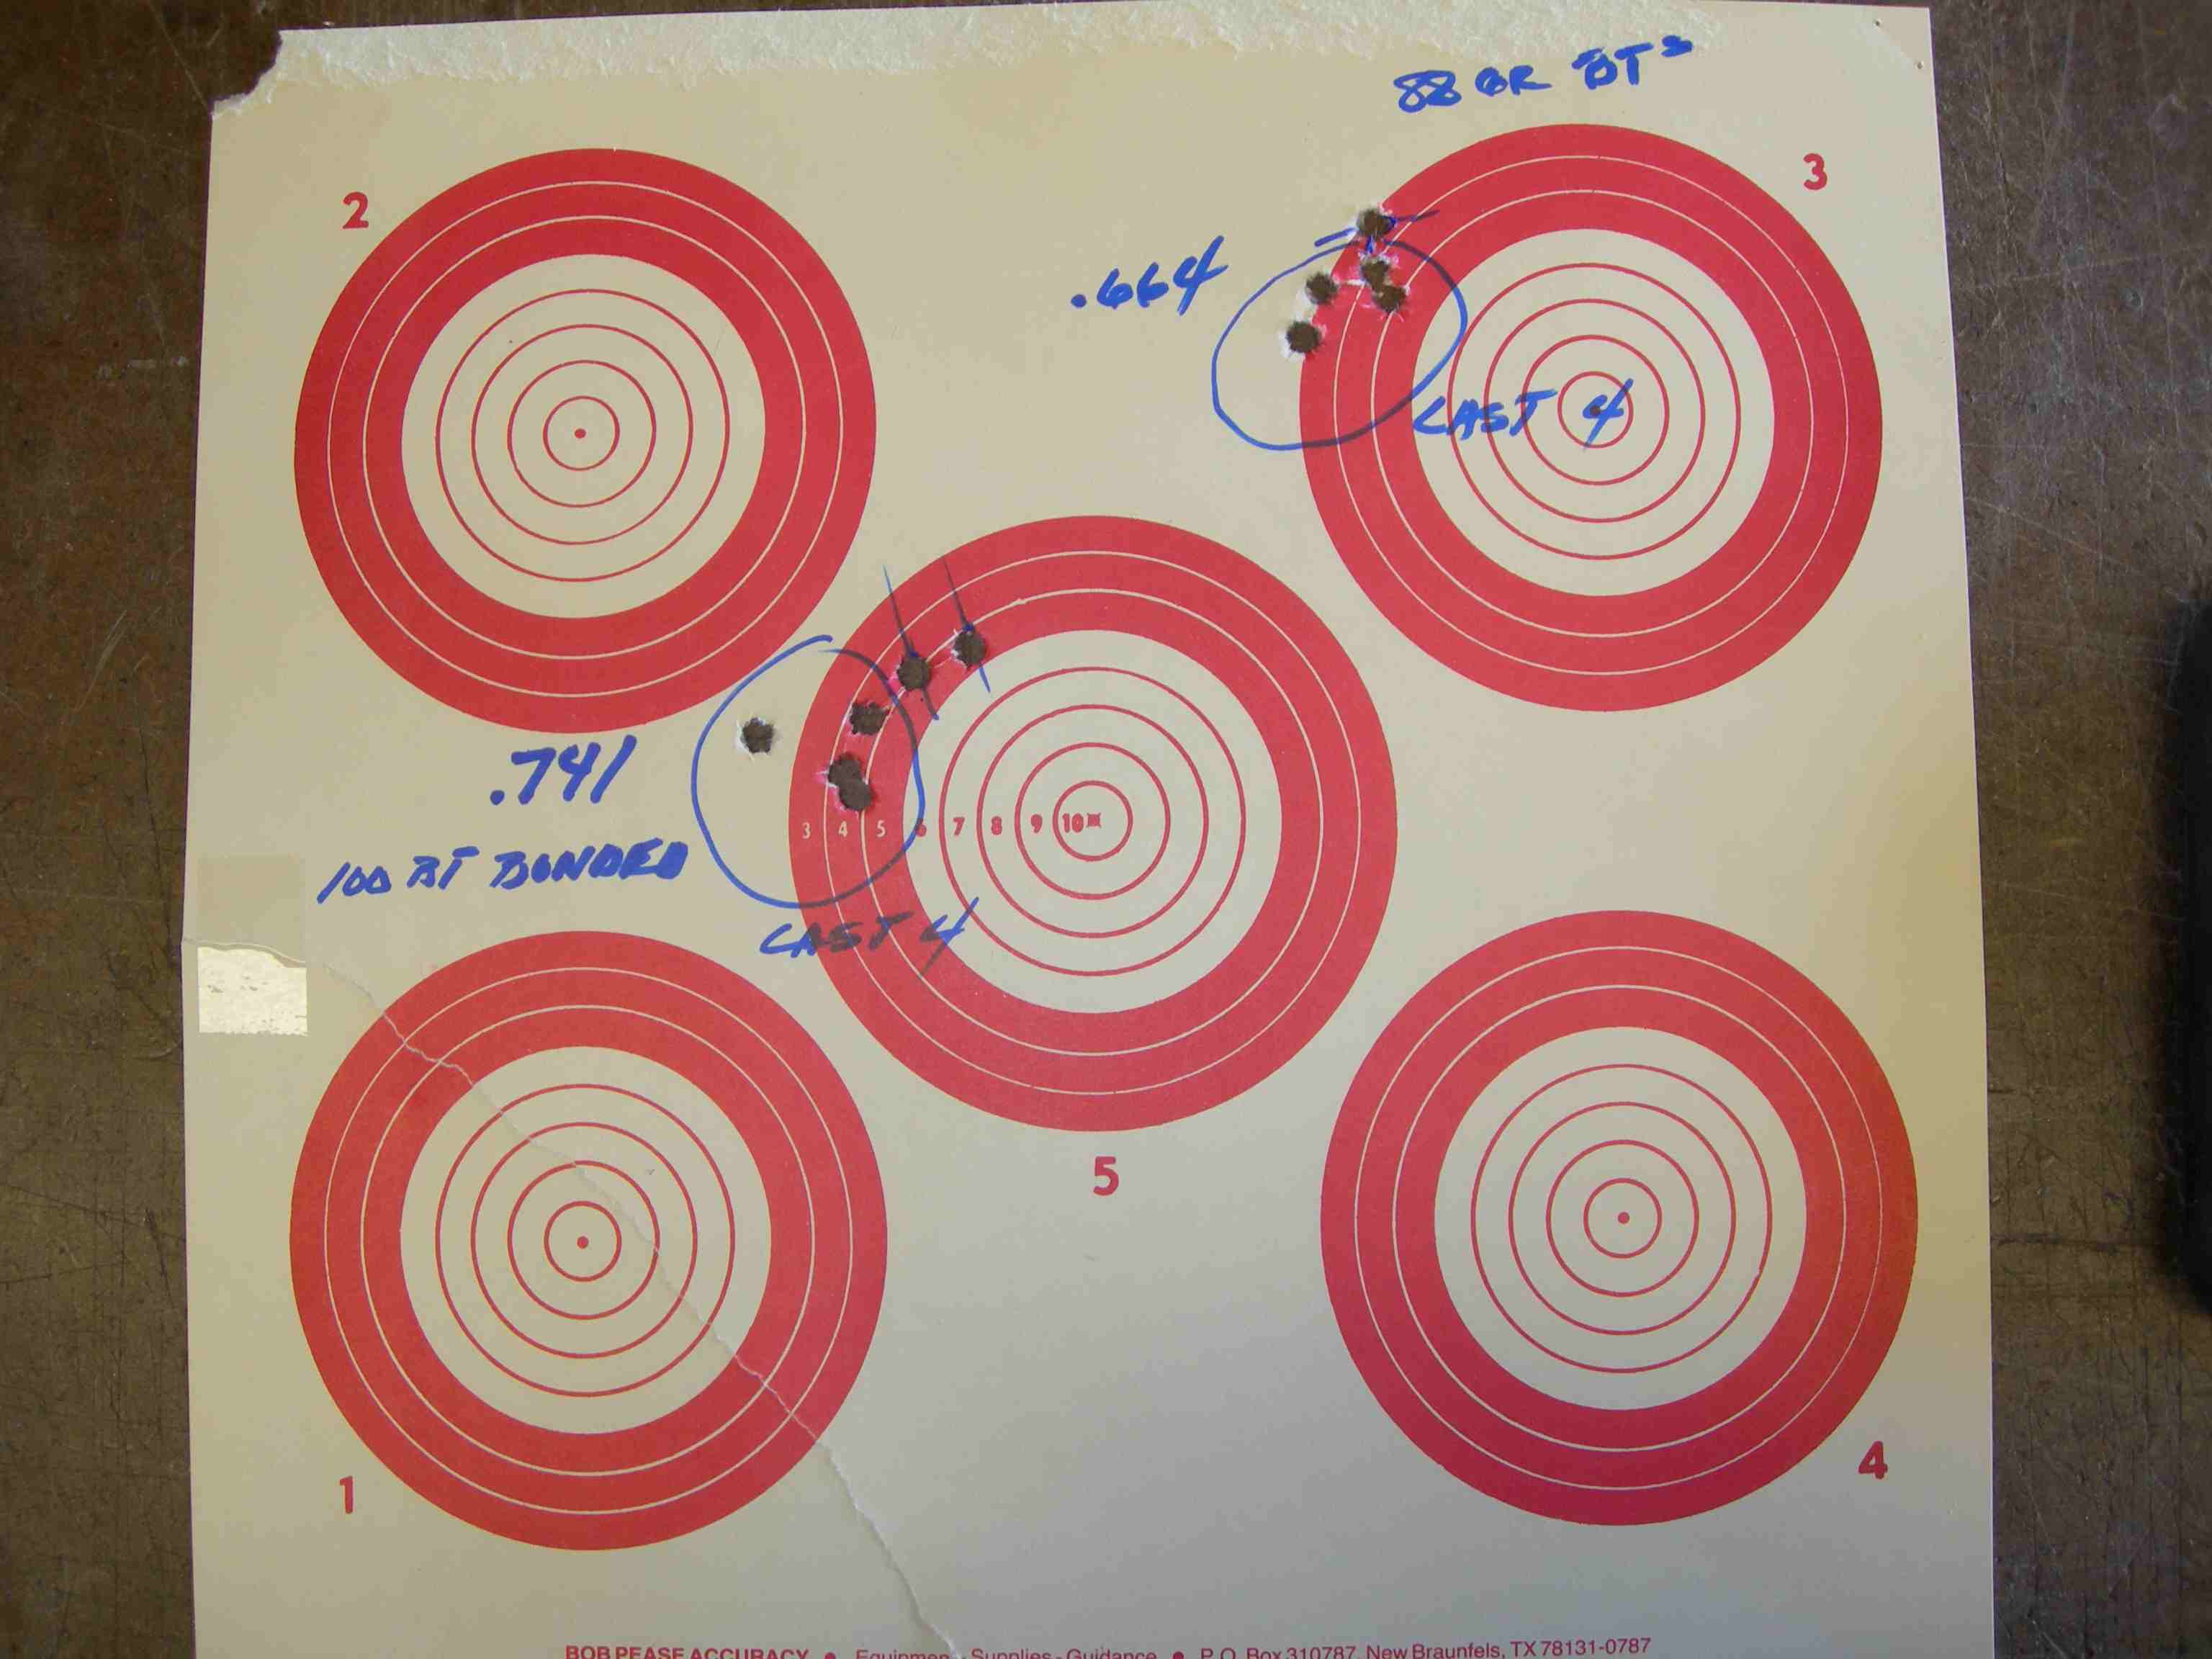
Inital test target
The ceramic heat treat blocks that I ordered work as described and as can be seen on the target did do an acceptable job but after the initial batch I wasn’t impressed. I did email Corbon’s and asked questions about the printed procedures to which they replied and eased my concerns. It seems that no mater what method of heating the cores to the melting point the copper jackets are going to be discolored, it doesn’t effect there performance but it just doesn’t look pretty……..oh well, I will find another way to bring them back later, maybe stainless steal media??
As the brain works (mine is off the grid at times) I had this epiphany, I would build a heat-sink from aluminum, drill a vast amount of holes just large enough to hold bullet jackets at ¾ depth of there length. This heat-sink would be round, somewhere around 1 inch thick, approximately 4 inches in diameter so it would fit over a propane stove burner and have some sort of center rod/ hook so it could be removed from the burner with tongs or pliers at the point the cores melted. Then when this bonding fixture is removed from the burner it could be placed on another heat-sink to draw the temperature down so the newly bonded jackets can be removed……………and so it came to pass that this epiphany actually works! This whole idea gave me an excuse to finally use my Palmgren rotary table……..(wish it were a true rotary table)
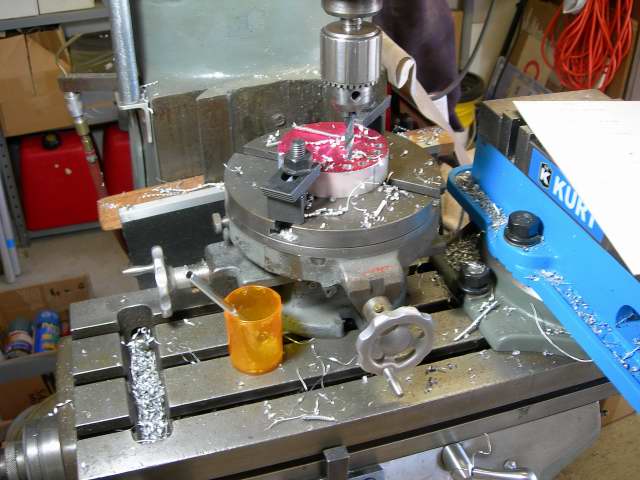
Heat sink machining

Heat sink machining
When I started this project it was with the idea that not only the 6mm bullets were going to be bonded but eventually my 30’s would be also. With the amount of set-up and mess I decided to machine a 30 cal heat sink at the same time.
Mistakes just seem to happen, the mind says yup this is right but the eyes look somewhere else and so it happened……….my table is not graduated in a full 360 degrees, it goes to 180 and starts over again so when figuring out where to set the table for the next hole it starts over with some other numbers. I made the mistake of having the 6 and 30 spacing in front of me at the same time hence looking at the wrong spacing numbers and screwing up the first 30 cal heat sink….(in corner of pic) …It probably wouldn’t have bother anything but it irritated me cause it didn’t look right so I made a third one.

Finished heat sinks
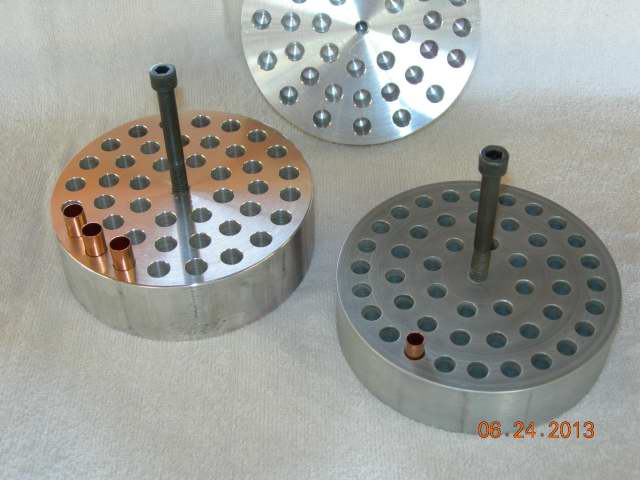
Heat sinks
The small propane stove here works very well, it took 4 ½ to 5 minuets to melt the cores then they were removed and placed on another block of aluminum to cool.
Cooking bullets

Cooling
In the following pics the bullets are completely finished; there are several steps that are required before this that I didn’t record. After bonding they have to be boiled in baking soda to neutralize the bonding agent (corrosive), washed and dried, lubed and core seated with the final point-up operation.
The big question…………is it worth the time and effort??? Dunno………….there is still the performance question that has to be answered and that is how it performs on the animals, the cost of ballistic gelatin is more than my budget will allow . It is a lot of work but also rewarding to know that push comes to shove I can make some performance hunting bullets when needed.

First cooked bullets
Lastly is a pic of the burner cage, the attempt to contain heat for faster cooking of the cores. So far the time runs between 4-5 minutes with the atmosphere of the day predicting the time required, some days shorter and some longer.

Burner cage

Burner cage

Cage in operation.
I hope this sheds some light on the subject of bonding bullets, there may be better ways but on a small budget and some makeshift ideas it has works admirably.

Hi, Rick.
Have you tried surrounding your bonding plate with firebrick material to retain heat and speed up production? I’m thinking of an angle iron frame work to hold the brick that could be lifted off to remove the plate when the bonding is finished.
You have some good ideas that I may have to copy. How have the aluminum plates held up under repeated heating?
All the best.
Al
Hi,
The method used at that time was what I had available I have since come up with a better method. I haven’t posted anything new in years due mainly to the flavor of the times (political). I can explain the new method but better in photos. I now use a large lead pot, they are available at buffalo arms. I have a puck the same thickness as the plates and that sits in the bottom of the pot, the plat sits on top and the process is much easier to cook them than a flame or the method that Corban describes. Very easy to do and much faster, the plates will last forever as mine have no signs of deteriorating.
Wow! Interesting idea. I agree. The torch method sucks. It’s okay for a few rounds but not for volume work.I tried a handheld induction heater but much too slow.
I can’t quite visualize your setup, but it seems promising. I still like the idea of an induction heater under or around your plates. Custom-made would be pricey, and I am no electronics expert to design the needful. I have been looking into an oven, but that is pricey and cumbersome.
I thought of having small holes in the bottom of your existing holes. A second plate with pins sticking up in a bottom plate could be used to push the cooled bullets up and out. Place the bullet plate over the pin plate and unload them in seconds.
With all these tariffs, it is just not affordable to buy from the US anymore. Now, with our new Prime Minister, things look ever more doubtful for smoke pole ownership in this country. At least as a 51st state, we would have the 1st and 2nd amendments.
All the best. Al
Sent from Proton Mail mobile
Don’t over think it, it’s not rocket science and simple is all one needs. Could actually use small cast-iron pot on open fire or stove, it would contain and heat evenly as my lead pot does.
Are u in Canada or farther away?
There are some pitfalls with the process, the chemical to bond (from Corbin) is caustic and will corrode the dies and punches so one must be very clean oriented thru the process.
Can send pics if desired on my method…would need to use personal email
Rick
Rick