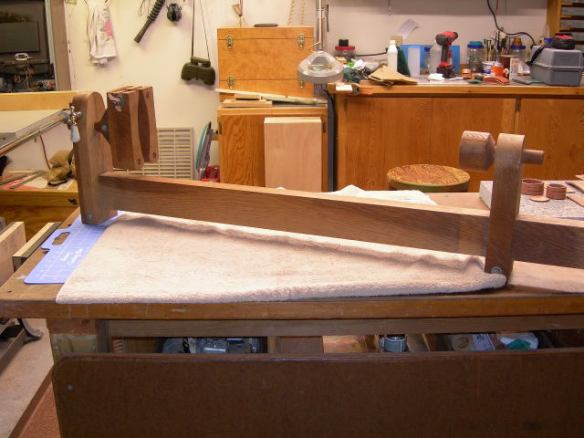
From the amount of traffic that there has been, search terms used and requests for my checkering cradle I decided a more detailed post was in order.
The history of this cradle dates back to around 1969-70, I probably saw a picture of some type of cradle that inspired what was or should say is my perception of what I thought one should look and function like. Now take into account I had never checkered anything in my life but I anticipated doing a lot of it at the time that this cradle was constructed. Shortly after finishing the cradle Uncle Sam decided he need me so many things were left hanging and this one was left hanging until the early 90’s when I finally dusted it off and made plans to use it.
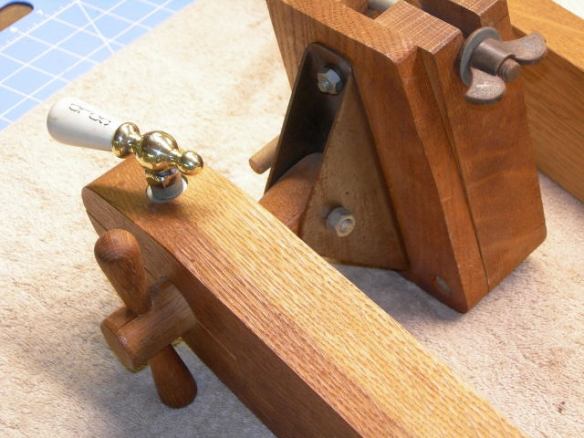
All of the lumber that was used in its construction was air dried oak, my father obtained a rather large pile of this stuff for nothing, which brings to mind that most of what I used back in those days was either free or discarded stuff. All of the carriage bolts used was from salvage, the nifty porcelain locking handle (it’s most distinguished feature) was from a cold water faucet that I found in the junk and the list goes on. To this day I still salvage and reuse all that I can, don’t throw anything away for you probably can recycle it and save a bunch of money.
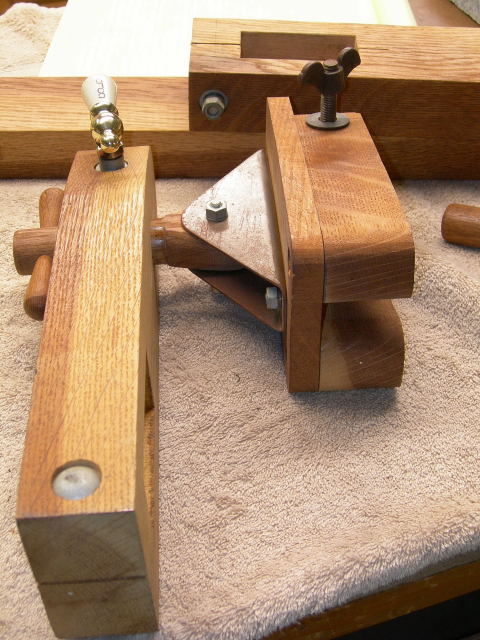
Now I have taken pics at different views of the components that make up the cradle, I hope that they satisfy all who have asked for dimensions for I do not have a dimensional drawing for it. I am listing basic dimensions of the components and the tolerances required will be up to whoever wished to construct one like it. So with that said…
The main beam is 44” x 3” x 1 ½”
The head piece is 12” x 3 ¼” x 1 ½” (slides on main beam)
The tail piece is 10” x 3 ¼” x 1 ½” ( “”””””””””””””””””)
The holes in head & tail piece are 1”
The distance form the top of the mortise to the center of the hole is 4 ½”
The back plate for the head stock jaws is 6 ½” x 4” x ½”
The jaws are 6 ½” x 1 ¾” thick with a 55 gal. Drum lid radius, don’t laugh, that has been used more times than I care to remember.
One jaw is dowel pinned form the back so it stays put, multiple holes can be used for different thickness stocks.
The cup for the tail piece can be made to suit, nothing special just some form of cup to contain a sporter forearm.
All bolts are 5/16” carriage bolts except for the head stock jaw bridge bolt and that is 3/8”.
In all cases the use of some sort of padding in the jaws and tail cup need be nothing more than scrap leather or similar synthetics.
The steel bracket on the head stock probably came from some sort of automotive gizmo; all I know is that I fabricated it just for this project. There was more stuff for gear heads in my dad’s garage than wood workers; in fact we spent more time working on cars than anything else.
FYI, the mortise are all hand done, drill holes, cut with coping saw and chisel to final fit, we had nothing fancy, just like it was done in the old days. The first table saw we had (I was about 10 at that time) was hand built completely from wood, I believe it was made by my uncle Luther; he was one of these old time carpenters, in fact I have his hand miter box, that is antique but cuts better than some power miters. The oak for this project was the worst warped stuff you could imagine, most of it started as 4x4s and worked down until it was straight and dimensional. So now for those who asked for more details I hope that it satisfactory, I’m sure that plans do exist somewhere for a pro-cradle, just where I do not know. I have used mine just 3 times, the Winchester 41-410 and to clean up checkering on 2 other rifles, just too many other projects to complete..
Thanks for the interest and looking…………


Thank you I enjoyed studying your Checking Cradle I didnt like the one that Brownells offers and have been looking around to see if anyone had made one that differed from the above. Yours is truely a work of art in itself and a true gunner’s need! Thank you for the materials list and will build one myself with as much reclaimed materials I can find! You should see my shop use to have 17,500 square feet in an old warehouse now I purchased an old indoor range and rehabbing it,,,,, Thanks Again
Donald Cole
(AKA Duke)
I’m building one. Refinish and checkering is my retired business. Seems to be a dying artform.
Bob Roskuski
RR Woodworking
Just down loaded the pics and layout. I don’t have oak but I do have a goodly supply of cherry and black walnut….will get to it as time allows. Thanks, G. Paul Shaw, Jr. MD (retired)
Rick, Gol-Dangit everytime I come and look thru your blog, I get Inspired to try and do the same. And, Like you…..it may take years but eventually I will get there, like with the cleaning cradle. Sure how was I to realize my prone stock will need a modified butt piece… Lol.
But this chechering cradle looks to be a project I am in need of to do some rasping/modifing of a thumbhole prone stock.
My Point is you sure do know to make the stuff the right way and with class and craftsmanship.. I always look forwards to finding something new here. Please keep up the great work and posting the pics..
Your “Nordakoton” friend.
Rod Vigsol
Fargo ND
Hi Rick,
I came across your website while searching for cradle plans, and I just finished mine about an hour ago. I admit that I made some changes, mainly I used a single 2 x 4 that was eight feet long, had it cut in half, using one half for the beam, and cutting the other parts from the second half. I think it turned out pretty good, and I am going to try to put it to use in the next week or so. Thank You for publishing your idea, and for making it easy so that even someone like myself could put it together.
William B
Best looking cradle I’ve seen. I particularly like the method you’ve used to secure the buttstock, and the selection of wood, even though it sounds as though it wasn’t a matter of choice. Oak is sturdy and looks good, even unfinished.
Thanks for sharing this with everyone.
Henry
That is one lovely gun stock. Checking cradle the best I’ve ever seen.