This stock is “For Sale”
Due to the fact that little interest in the game around my area.

Mini-Me Rimfire
The term Mini-Me is reference to a rimfire BR, the little brother to my 30BR score gun built in 2005, it was my first BR stock project of my own design, and now the second half of that blank is finally being carved into a rimfire BR stock. This project was just a thought at the time I built the 30BR and has taken until now to turn it into reality. I actually purchased this 64MS new in 1985, at that time there were several clubs shooting rimfire silhouette and for the price it was my entry level ticket. Knowing that the 64 Anschutz would probably never really compete with the full blown 22 Rimfire BR rifles it still was a fun project and at this point I really didn’t care whether or not it would ever be competitive. The wood used on this stock was the worst half of the laminated blank, this portion of the blank had sap wood which I strategically laminated together so it wouldn’t be mixed with the best portions. Now if this doesn’t make sense I will put it this way, I had 3 Walnut planks when I finished milling that were of good quality for a stock, they all had some sap wood, good grain structure so I made sure that any sap wood wouldn’t be in one half of the blank, Walla I ended up with 2 stock blanks from that one laminated blank, one with sap wood and one without.
My 30BR was a 2 year project, started with developing my bullets, ordering parts, barrel, chamber reamer and designing my stock, that stock took 6 months to carve and a total of 2 years before I completely finished it while still shooting the gun. When using a hand held router to make all the cuts it gets frustrating at times and when I reached my wits end I would stop and give it a brake. I look back on all the jigs and fixtures I made to make the cuts, I hate to tell just how many didn’t work but in the end I ended up with a finished product which was close to what I had envisioned.
Now some 6 years later I decided to finish what I had started earlier, the blank has sat in the rafters of the shop collecting dust and admittedly it had warped, my fault, I should have taken precautions. To begin it was milled flat on one side, squared to bring it back to a useable blank; (it really wasn’t warped much) I didn’t take pictures of this so I will explain. It was clamped to a flat surface; a box was fixed around the blank and secured to the work surface, an auxiliary large base was attached to the router base and with a ¾ inch planning bit it was milled flat on one side. To see pics of how it was done check Projects Past and Present, the 41-410, I used the same set-up for this project.
Everything starts from centerline, this goes without question, the blank is marked all the way around and when it the line is milled off I add it back. The biggest difference between the 30 stock and this one is I used a mill to inlet, what a difference, the 6 months and countless set-ups was replaced with 2-3 days to a completed stock. I was attempting to make this little 22 stock as close to the original 30 stock as I could, probably spent more time remembering just what I used and how I did it than actual working time, plus I was getting use to my mill and it’s capabilities.
I started by leveling the blank in the mill, used a 1 inch ball cutter to cut a channel down the centerline to depth then referenced where the action screw holes were to be and drilled them. The screw holes determine just where the rest of the inletting goes which most of that was done with a ¾ inch mill cutter and in some cases a ½ inch router bit.


After all the cuts were made up top the stock was flipped over and the trigger guard was inletted, I decided to use a Remington clone TG instead of the Anschutz, mainly for the aesthetics. Also in this picture you will notice that several cuts with a router have been made giving it some shape.

Remington TG
In the next pic I have clamped the stock in my Record 52 ½ D bench vise, this vise in my opinion is probably the most used piece of equipment in my shop, can’t say enough about it. I debated a long time as to just how I was going to shape the butt section, in last resort I went back to the draw knife with a lot of caution. In the past I have had things go horribly wrong using a draw knife but I couldn’t figure any other way to make these cuts.
As the cuts get closer to the finish line I made a thin aluminum plate (not shown) to keep from over running the line. The draw knife will cut the aluminum as easily as the wood and keep from chipping the end of the butt, then when everything is close that plate is discarded.


At this point the final butt plate is being made; the holes are drilled, countersunk, and rough shaped on the belt sander and attached to the stock. I use a flush trim bit in the router table to mate the butt plate to the stock. I also laminated the last pieces to the forearm to get the 3 inch width. (No pics of this being done) The additional stock added to the forearm is the last step when all inletting and most of the shaping is finished, in this way it is easier to relocate centerline and make any modifications to it if they were missed. (I never miss anything .. LOL) My stock shape is very different than anything available, it has a more radical V shape butt and thicker. On the 30 it hammers in on the first shot and stays there, no bag settling or shifting after.


Flush trimming
Now that the shaping, inletting and the butt section are pretty much finished, the pillar was made, (the pillar is in the picture just to the right of the hammer). Most of my pillars are made of either 2011 or 7075 aluminum; the reason is it cuts much cleaner than open market 6061, a good percentage of the 6061 seems to be chewy, sometimes one gets lucky but my source is unpredictable so I opt for the other grades.

Pillar Assy right of the hammer
Before I went any farther I sealed the stock, the mill has a tendency to drip oil at a point in time that is unwanted, no mater how much is wiped down it seems as though it happens. Here I am setting up to drill for the pillar, yes it is singular, just one pillar and for good reason as the rear action screw attaches in the trigger housing screw. The previous stock was bedded the same way some 15 years earlier; this allows the action to float removing the stress from the tang area, it has served me well. Ok, the stock is leveled and the hole is located with my center finder then a Foster bit was installed and a thru hole was drilled, Walla we are now finally ready to bed the stock.

In this picture I have the stock clamped in my bench vise, the pillar is attached to the barreled action, everything except the pillar is waxed for release agent and the hot melt glue gun is warming up.

Now I need to explain my technique here, I have been using this bedding method for some 25 years now and in my opinion nothing beats it. The object is to obtain a stress free job which I fail to see just how one accomplishes it with other methods explained on some well known forums. At this point I am not going to judge nor argue the merits of others, I would have shared this on several forums but for the attitudes of some of the posters I find it not worth the time. I begin with a marked centerline of some sort for alignment, apply 2 pads of hot melt in the barrel channel, install the barreled action and hold it down by the ‘action’ until the glue sets up, (not the barrel) this only takes 30 seconds. At this point use a mallet and tap the barrel until it breaks loose, we now have an established where everything will be when the bedding is finished, check or centerline and parallel and if it is off, redo. The next step is removing material in the action area, where the pillar is going and wherever else bedding is wanted, one can repeatedly remove and install the barreled action without ever disturbing the bedding pads.

The area around where the bedding compound may ooze out is taped to make cleaning easier then Devcon putty is applied to the stock and the barreled action to eliminate voids. The barreled action is pushed in the stock and held by the barrel only, a piece of surgical tubing is wrapped around the barrel between the 2 pads and let the action suspend freely until it sets up. The beauty of this is the pads never move, if the bedding has to be redone just grind it back out and re-bed.

Bedded waiting set-up time
When the bedding is set-up, Devcon states 16 hours but I usually let them sit at least 48 hours before pulling them apart, they used to state a 72 hour cure time so that has kinda stuck with me. Below is what it should look like when it is pulled apart, clean and no voids but I will admit voids are something I do not worry about as long as I have 75% contact.

Complete Bedding Job
In the next pictures I am removing the bedding pads; I use a small carving gouge to pop them out. It doesn’t destroy anything, some surfaces require more effort to remove them but in most cases it is clean with no damage.

Removing Pads
I have been going to post my bedding technique for some time but things keep getting in the way or I run into a time constraint when doing a bedding job and forget to take pictures. At some point in time I will post this on it’s own and not under a project, take it for what it is worth, like it or leave it, in my opinion the other methods are inferior but then I am partial.

Removing Pads
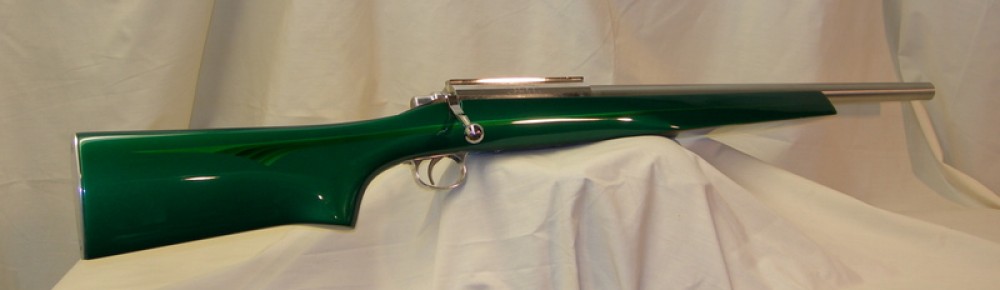
Some pictures of the completed stock…………..


Some details:
Many use some sort of automotive clear finish, while this is fine for a glass and laminate birch stocks I am not a fan of using it for Walnut. For ease of use I like Helmsman Spar Urethane, I usually use the gloss formula for the first few coats, brush it on and for the final coat I use the satin formula in the aerosol can. Satin has a very slippery surface unlike the gloss which tends to stick and when using the satin you never need to add anything to the cordura bags they stay slick. I was once told by a stock painter to use Helmsman instead of the 2 part clears, according to him they were just as durable if not more so than the automotive clears but they should be baked to cure them faster, so far that hasn’t been a problem. The other feature is you do not need a special place with fancy respirators to spray, get a little dirt or imperfection on the surface, sand it off and recoat, much less costly that automotive finishes.

Rick, you are an artist. Beautiful job of capturing how you made your stock. Sadly I don’t have a mill (among) other things. Excellent photos. Excellent text. I think I am going to have another look at a router table I was given and see if I some how make that work as a poor man’s mill.
Can you tell us more about what I would assume is a “washer” under the single action screw?
And, after all of that, does it shoot any better than before? That is elegant stock for a 64! 🙂